Website and research by 101Leafy.
Home › Items › Magical Key

Magical Key

For The Legend of Zelda on the Nintendo Entertainment System (NES).

From the manual

Opens a locked door in a dungeon. A key is gone once used, but the Magical Key works any number of times.

Translated from the Japanese manual.

Item

Magical Key

KindItems
Japanese nameマジカルキー

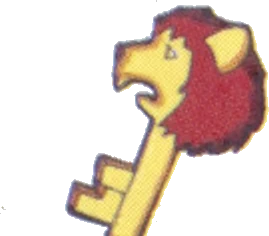
Official art

Magical Key, official art from ゼルダの伝説 取扱説明書
Magical Key. ゼルダの伝説 取扱説明書 (任天堂, 1986), p. 21

From the official guides

Needed to open locked doors in the labyrinths. The Magical Key in particular is a handy key that can be used any number of times. While Link has it, the counter shows A (almighty).

ゼルダの伝説 取扱説明書 (任天堂, 1986), p. 21, 101Leafy's translation

Needed to open locked doors in the labyrinths. The Magical Key in particular can be used any number of times. While Link has it, the counter shows A (almighty).

ゼルダの伝説1 取扱説明書 (任天堂, 1994), p. 15, 101Leafy's translation

Link needs these to open the locked doors in the labyrinths. The magical key is very useful. Link can use it over and over again. Once he's got this magical key, "A" will be displayed showing that he's unstoppable!

The Legend of Zelda Instruction Booklet (Nintendo of America, 1987), p. 22

You must have keys to open doors in the mazes. The regular key can be used only once but the magical key can be used as many times as you want. If you obtain the magical key, the number indication turns to "A" (Almighty).

The Legend of Zelda Tips and Tactics (Tokuma Shoten Publishing for Nintendo of America, 1987), p. 16

A key shaped like a lion's head. It opens every door with a keyhole. It is in Level 8.

ゼルダの伝説 (二見書房, 1986), p. 78, 101Leafy's translation

An all-purpose key with a lion's face on it. No matter how many locked doors there are, no problem! The Lion Key is hidden in the Lion labyrinth (Level 8).

ゼルダの伝説 必勝攻略ガイド (新星出版社, 1986), p. 10, 101Leafy's translation

Opens every door. The key display changes to "A" too.

ファミリーコンピュータ攻略ガイドブック1 ゼルダの伝説 (曙出版, 1986), p. 50, 101Leafy's translation

Used to open doors in the labyrinths. The Magical Key can be used any number of times.

ファミリーコンピュータ必勝シリーズ1 ゼルダの伝説 (ミリオン出版, 1986), p. 4, 101Leafy's translation

It opens locked doors (what else would it be for!). A normal Key is used up, but the Magical Key lasts forever. Handy!

ファミコン マル勝DXシリーズ1 ゼルダの伝説 (角川書店, 1986), p. 60, 101Leafy's translation

An ordinary key can be used only once, but this Magical Key can be used as many times as you like. Very handy.

ゼルダの伝説 (秋田書店, 1986), p. 20, 101Leafy's translation

An all-purpose key called the Lion Key. It can be used any number of times, so once you have it, you don't need normal keys anymore.

ゼルダの伝説 (双葉社, 1986), p. 13, 101Leafy's translation

You need them to open locked doors in the labyrinths. With the Magical Key, the counter shows A (almighty) and you can use it any number of times, which is very handy.

ケイブンシャの大百科別冊 ゼルダの伝説1 (勁文社, 1994), p. 9, 101Leafy's translation

It is hidden underground in Level 8. With it you can open locked doors as many times as you like. Handy, since you don't have to look for keys.

ゼルダブック (ファミコン必勝本 1986年6月号付録) (JICC出版局, 1986), p. 78, 101Leafy's translation

A normal Key can only be used once, but the Magical Key works as many times as you like. Once you have the Magical Key, the key count shows A (almighty).

わんぱっくコミック増刊 ゼルダの伝説 必勝ヒント本 (徳間書店, 1986), p. 9, 101Leafy's translation

Labyrinths

First Quest

Level 8

  • Room 15 (down a stairway)

Second Quest

Level 7

  • Room 44 (down a stairway)

Red: the item's room. Green: the entrance.

What it is for

It opens every locked door, so Link no longer spends keys. These rooms have locked doors.

First Quest

Level 1

  • Room 34
  • Room 35
  • Room 51
  • Room 53
  • Room 66
  • Room 67
  • Room 68
  • Room 69
  • Room 82
  • Room 99
  • Room 115

Level 2

  • Room 46
  • Room 47
  • Room 94
  • Room 95
  • Room 110
  • Room 111

Level 3

  • Room 59
  • Room 74
  • Room 75
  • Room 76
  • Room 89
  • Room 90

Level 4

  • Room 0
  • Room 1
  • Room 32
  • Room 33
  • Room 48
  • Room 49
  • Room 97
  • Room 98

Level 5

  • Room 5
  • Room 6
  • Room 22
  • Room 36
  • Room 37
  • Room 38
  • Room 39
  • Room 70
  • Room 86
  • Room 102
  • Room 103

Level 6

  • Room 9
  • Room 25
  • Room 28
  • Room 41
  • Room 44
  • Room 106
  • Room 120
  • Room 121
  • Room 122

Level 7

  • Room 11
  • Room 24
  • Room 25
  • Room 27
  • Room 28
  • Room 40
  • Room 56
  • Room 72
  • Room 88

Level 8

  • Room 30
  • Room 46
  • Room 62
  • Room 77
  • Room 78
  • Room 94
  • Room 95

Level 9

  • Room 1
  • Room 2
  • Room 6
  • Room 18
  • Room 19
  • Room 20
  • Room 21
  • Room 22
  • Room 34
  • Room 35
  • Room 37
  • Room 38
  • Room 48
  • Room 51
  • Room 54
  • Room 64
  • Room 80
  • Room 83
  • Room 98
  • Room 99
  • Room 115
  • Room 116

Second Quest

Level 1

  • Room 23
  • Room 24
  • Room 55
  • Room 56

Level 2

  • Room 21
  • Room 37
  • Room 101
  • Room 102
  • Room 118

Level 3

  • Room 10
  • Room 26
  • Room 43
  • Room 59
  • Room 73
  • Room 74
  • Room 89
  • Room 90

Level 4

  • Room 16
  • Room 17
  • Room 97
  • Room 113

Level 5

  • Room 76
  • Room 77
  • Room 92
  • Room 93
  • Room 95
  • Room 111

Level 6

  • Room 4
  • Room 5
  • Room 66
  • Room 82
  • Room 83

Level 7

  • Room 11
  • Room 12
  • Room 40
  • Room 56
  • Room 61
  • Room 72
  • Room 73
  • Room 77
  • Room 105
  • Room 106

Level 8

  • Room 29
  • Room 30
  • Room 74
  • Room 90

Level 9

  • Room 34
  • Room 35
  • Room 51
  • Room 65
  • Room 67
  • Room 80
  • Room 81
  • Room 97

Red: the item's room. Green: the entrance.