Blauer Wizzrobe
Für The Legend of Zelda auf dem Nintendo Entertainment System (NES).
Gegner

| Art | Gegner |
|---|---|
| Englischer Name | Blue Wizzrobe |
| Japanischer Name | 青いウィズローブ (Übersetzung von 101Leafy) |
Offizielles Artwork
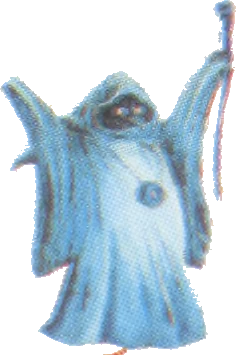
Aus den offiziellen Büchern
It teleports to appear here and there and casts spells the small shield cannot block. Very strong.
It teleports to appear here and there and casts spells the small shield cannot block. Very strong.
The Master of Movement. He appears here and there letting out magic spells that Link's little shield can't hold back. He's pretty strong. Watch out!
Using the magic of movement, Wizzrobes appear here and there. Wizzrobes chant spells which are blocked only by the magic shield. There are two kinds of Wizzrobes, yellow ones and blue ones. Their offensive powers are strong. You must be more careful with the blue Wizzrobes. The movement of the yellow Wizzrobes, however, is easily detectable.
A wizard of spells and warping. Block its spells with the Magical Shield, close in quickly, and thrust your sword. It is quite tough.
A magician who casts spells. It warps around, so you never know where it will attack from. The small shield cannot block its spells. It is a real tricky one. There are red and blue ones, and the red one casts spells more often.
It uses a moving spell and casts magic that only the Magical Shield can block. There are two types, yellow and blue, and the blue one is stronger. A tough enemy.
Its attack is quite strong. You need the Magical Shield.
A rather tough enemy in the labyrinths. It appears and vanishes and attacks with spells. There are orange and blue ones. The first is the "Druaga" type. The second wanders around the room and fires spell after spell when it spots Link. Your only weapon against it is the sword.
A wizard who lives in the underground labyrinths. Watch out: it uses a moving spell to appear here and there and fires powerful spells. The small shield can't block those spells, so you need to equip the Magical Shield.
The red ones vanish as they move. The blue ones don't vanish, but their life is among the strongest. Both cast powerful spells.
Sorcerers of the labyrinths, wrapped head to foot in robes. They use a moving spell to appear here and there, and cast spells too strong for the small shield to stop. Their attack is quite strong too, so watch out.
Only the Magical Shield can block the spells this strange sorcerer casts. It uses a moving spell to appear here and there, so stay quick on your feet. The red one vanishes and reappears. The blue one has even more stamina.
It uses a moving art to appear here and there and casts spells. Only the Magical Shield can block those spells.
Werte
Treffer bis zum Sieg
 Holzschwert10
 Weißes Schwert5
 Magisches Schwert3
 Pfeil5
 Silberpfeil3
 Bomben3
 Blaue Kerze10
 Rote Kerze10
 BumerangHält ihn an
 Magischer BumerangHält ihn an
 Zauberstab5
- Zauberstab (Magie)5
Verlorene Herzen pro Berührung
| Kein Ring |  Blauer Ring |  Roter Ring |
|---|---|---|
| 2 | 1 | 0,5 |
Was er wirft
Nur dieser Schild wehrt es ab:

Schadensrechner für alle Gegner
Beute
Lässt in 80 von 256 Fällen (31,3%) etwas fallen. Was es ist, bestimmen diese 10 Plätze der Reihe nach:


Wo er vorkommt
Labyrinthe, Erste Quest
Level 6
- Raum 9: 3 gleichzeitig
- Raum 27: 2 gleichzeitig
- Raum 40: 3 gleichzeitig
- Raum 41: 3 gleichzeitig
- Raum 44: 2 gleichzeitig
- Raum 56: 2 gleichzeitig
- Raum 58: 2 gleichzeitig
- Raum 60: 3 gleichzeitig
Level 9
- Raum 4: 2 gleichzeitig
- Raum 5: 3 gleichzeitig
- Raum 7: 3 gleichzeitig
- Raum 16: 3 gleichzeitig
- Raum 21: 3 gleichzeitig
- Raum 23: 2 gleichzeitig
- Raum 32: 3 gleichzeitig
- Raum 48: 2 gleichzeitig
- Raum 49: 2 gleichzeitig
- Raum 53: 3 gleichzeitig
- Raum 64: 3 gleichzeitig
- Raum 69: 2 gleichzeitig
- Raum 70: 6 gleichzeitig
- Raum 71: 3 gleichzeitig
- Raum 83: 2 gleichzeitig
- Raum 84: 3 gleichzeitig
- Raum 87: 3 gleichzeitig
- Raum 100: 2 gleichzeitig
- Raum 101: 3 gleichzeitig
- Raum 115: 3 gleichzeitig
Labyrinthe, Zweite Quest
Level 4
- Raum 1: 5 gleichzeitig
- Raum 49: 2 gleichzeitig
- Raum 64: 2 gleichzeitig
- Raum 80: 2 gleichzeitig
- Raum 113: 2 gleichzeitig
Level 6
- Raum 19: 3 gleichzeitig
- Raum 20: 3 gleichzeitig
- Raum 51: 2 gleichzeitig
- Raum 68: 3 gleichzeitig
- Raum 82: 2 gleichzeitig
- Raum 84: 2 gleichzeitig
- Raum 99: 2 gleichzeitig
- Raum 100: 3 gleichzeitig
Level 9
- Raum 17: 3 gleichzeitig
- Raum 21: 3 gleichzeitig
- Raum 34: 6 gleichzeitig
- Raum 35: 2 gleichzeitig
- Raum 49: 2 gleichzeitig
- Raum 50: 2 gleichzeitig
- Raum 69: 3 gleichzeitig
- Raum 82: 3 gleichzeitig
- Raum 83: 2 gleichzeitig
- Raum 86: 3 gleichzeitig
- Raum 87: 2 gleichzeitig
- Raum 101: 3 gleichzeitig
- Raum 102: 2 gleichzeitig
- Raum 115: 2 gleichzeitig
Rot: Räume, in denen er vorkommt. Grün: der Eingang.