Niveau 2
Pour The Legend of Zelda sur Nintendo Entertainment System (NES).
Dans les guides officiels
The Underworld maze, level 2 has a crescent shape like the crescent moon. Even if it's a little tougher than level 1, you won't have much difficulty in level 2. Since you have already cleared level 1, you now have four Life Hearts.
Level 2 (Moon) is full of Rope snakes. The first time you meet them their sudden charge takes you by surprise, but they are weaker than they look and often drop treasure, so this is a good place to earn!
The Moon labyrinth (Level 2), shaped like a crescent moon, has no basement rooms! To make up for it, sort of... if you visit every room that gives a key, you end up with one key to spare! So even if you miss one in the next labyrinth, you are fine!
Level 2, the Moon Labyrinth, is inside the ruins about five screens to the right of the Eagle Labyrinth (Level 1). To get there, though, you have to come around from farther to the right. Have you got a potion?
The Triforce is in the place farthest from the start. Many walls can be blown open with bombs, so choose your route and go through the rooms efficiently.
Make sure you get the Magical Boomerang in this labyrinth. Getting it is quite dangerous, though.
Go in with plenty of Bombs. Dodongo has a weak point... it really does!
In Level 2, an army of snakes swarms out. They aren't very strong, but they sometimes speed up all of a sudden, so stopping them with the Boomerang and then attacking works well. The labyrinth is long and narrow, with lots of walls you can break. Use your bombs. It is about as hard as Level 1. Now, take it on without flinching!
The Level 2 labyrinth is shaped like a moon, and the Triforce is hidden at the very top.
Carte
 131430314647626378799495108109110111125126


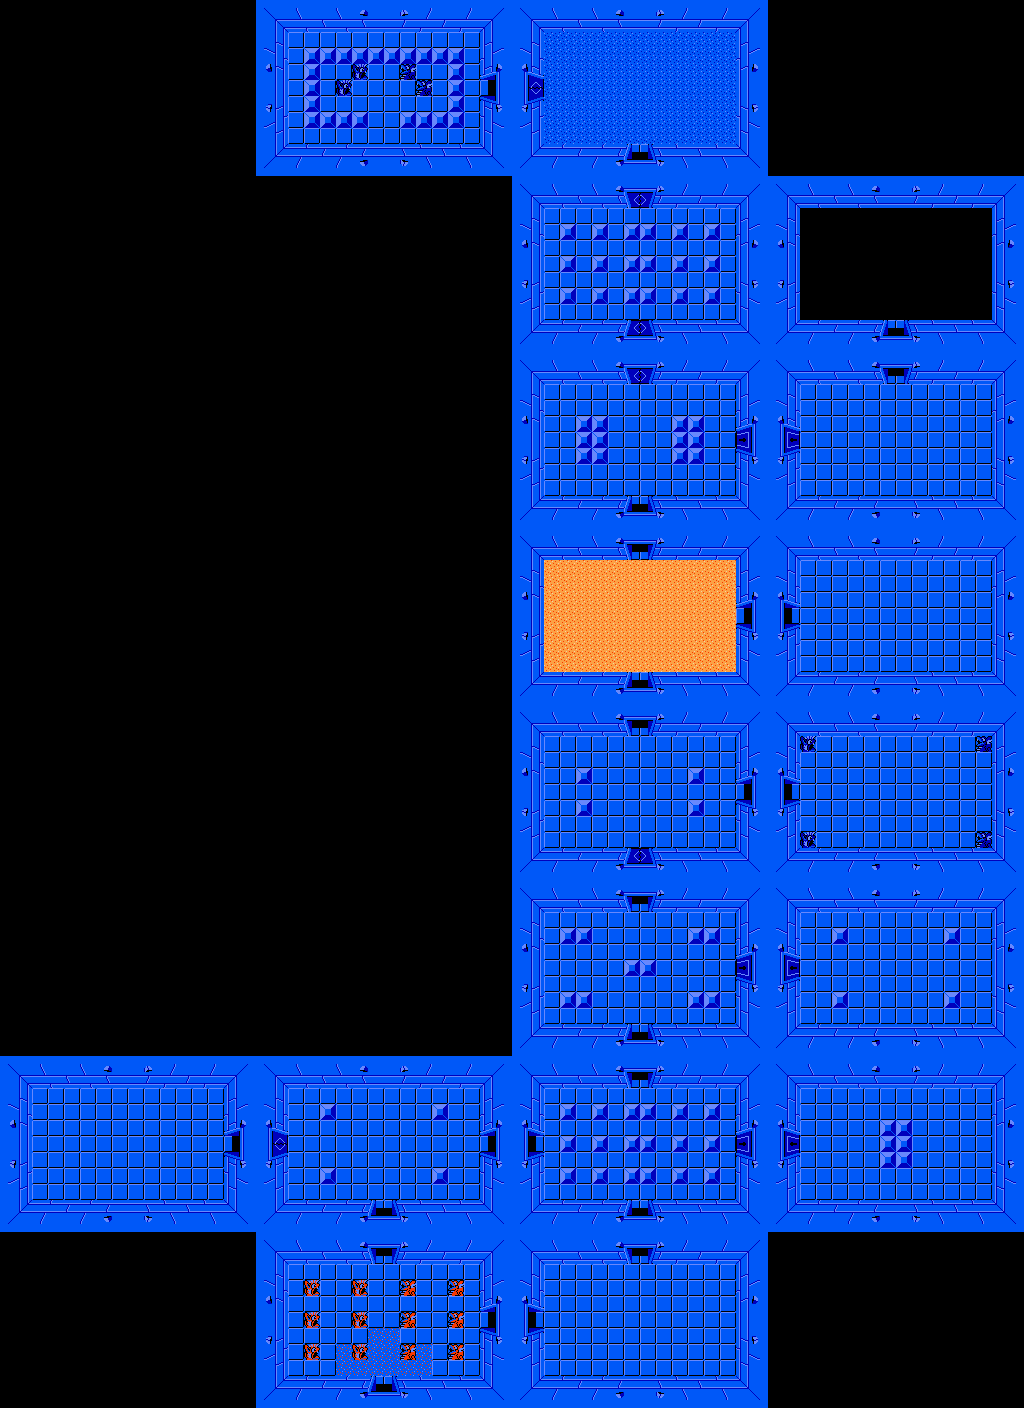
Les salles sont dessinées comme le jeu les construit, avec leur numéro sur la grille de salles 16 × 8 du jeu. Chaque objet est placé sur la salle où il se trouve ; un objet en bas d'un escalier est placé sur la salle de l'escalier. L'entrée a un cadre vert.
Objets
- TriforceSalle 13: Posé dans la salle
- Réceptacle de cœurSalle 14: Apparaît une fois tous les ennemis de la salle vaincus
- BombesSalle 30: Apparaît une fois tous les ennemis de la salle vaincus
- 5 rubisSalle 47: Apparaît une fois tous les ennemis de la salle vaincus
- CléSalle 62: Apparaît une fois tous les ennemis de la salle vaincus
- BombesSalle 63: Posé dans la salle
- CléSalle 78: Apparaît une fois tous les ennemis de la salle vaincus
- Boomerang magiqueSalle 79: Apparaît une fois tous les ennemis de la salle vaincus
- CarteSalle 95: Posé dans la salle
- CléSalle 108: Posé dans la salle
- BoussoleSalle 111: Posé dans la salle
- CléSalle 126: Apparaît une fois tous les ennemis de la salle vaincus
Ennemis
 Goriya bleu3 dans 1 salle
 Goriya rouge10 dans 2 salles
 Gel16 dans 3 salles
 Keese bleu4 dans 1 salle
 Rope32 dans 6 salles